For a quick intro, please check the 'How to Contribute' section for how ShortcutWorld content is organized and how to access the Editor.
Please use search function to check if the Application doesn't already exist. Then clock on 'Add Page' on the top menu. Provide application name and if versions should be listed separately. Use versions only if it makes sense. Select a platform such as Windows or MacOS. Finally, please provide one or multiple Groups (e.g. Adobe Creative Suite) and Categories (e.g. 3D Computer Graphic). A Twitter handle will trigger an automated Tweet from @ShortcutWorld tagging the application handle once the page is approved. Click next to access the Page Editor.
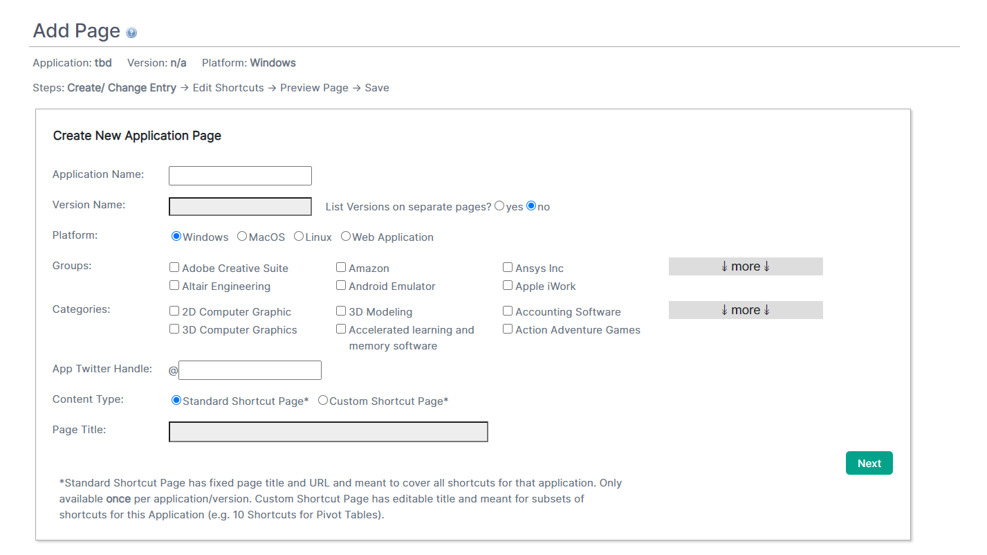
Provide Application attributes and click on 'next' to create content
If the Application Page already exists, please use the plus sign on any Shortcut Page to add Pages to the application.
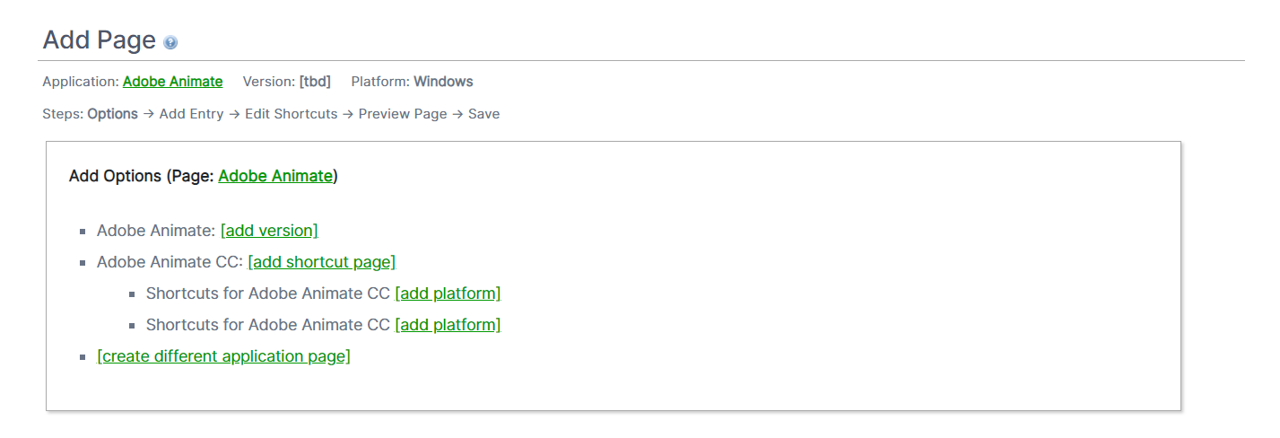
Shortcut Pages can be added to existing Applications
Access the Page Editor by creating a new Shortcut Page, or when editing an existing Page. You can edit Shortcut Pages by using the Page- or the XML-Editor Editor and you may switch between them any time. For complex pages, it is recommended to switch to the XML editor occasionally, copy the XML data to a local text editor to keep a backup of your work. The format for Shortcut Pages is fixed into one line per Shortcut broken down into Keystroke and Description for each. Shortcuts can be grouped into Categories and Categories can have Sub-Categories. Sub-Categories can be promoted to Categories, and Categories can be promoted so that all Shortcuts are uncategorized. Each Page can have a Page Intro text. Pages can list sources which at times may not be displayed globally depending on the level of link-spam. Finally, Keystrokes have a square bracket to format the keys when displayed. Clicking on 'Format Keys' will automatically add most of the brackets.

Access Editor functions via the Editor Menu
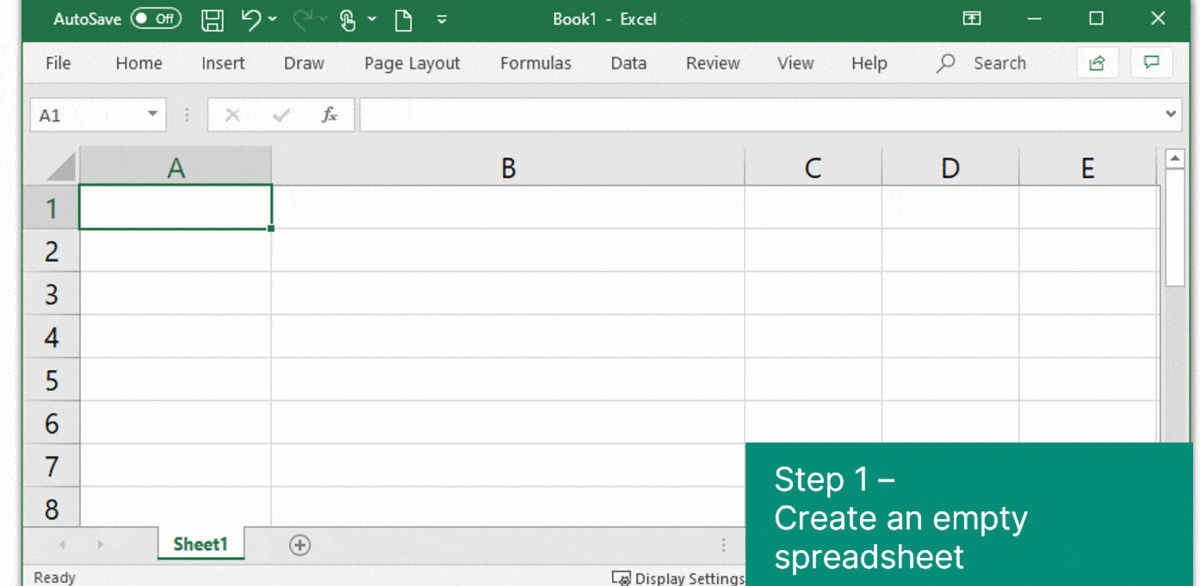
Shortcuts can be added line by line or via bulk. To add new lines one-by-one, press on 'Add Shortcuts', or press [Tab] at the end of each line. A better way is to create pages by preparing the data in a spreadsheet application and copy & paste multiple lines at once. Create a spreadsheet with 2 columns: first column for Keystrokes and second column for Description. Then select multiple lines, copy to clipboard, and paste into the first Keystroke field in the Page Editor. If you have multiple categories, copy & paste each category from your spreadsheet into the Page Editor. The same works with a text editor as source - all that is required is a tab between keystroke and a line break after each description.
Access Editor functions via the Editor Menu
Press 'Format Keys' to add square formatting brackets to most keystrokes. This recognizes most common keystroke terms such as CTRL, control, arrow right, etc. Besides adding brackets, terms are harmonized primarily into starting with uppercase letters and a few others. Keystrokes can be formatted multiple times; already formatted keystrokes are ignored.
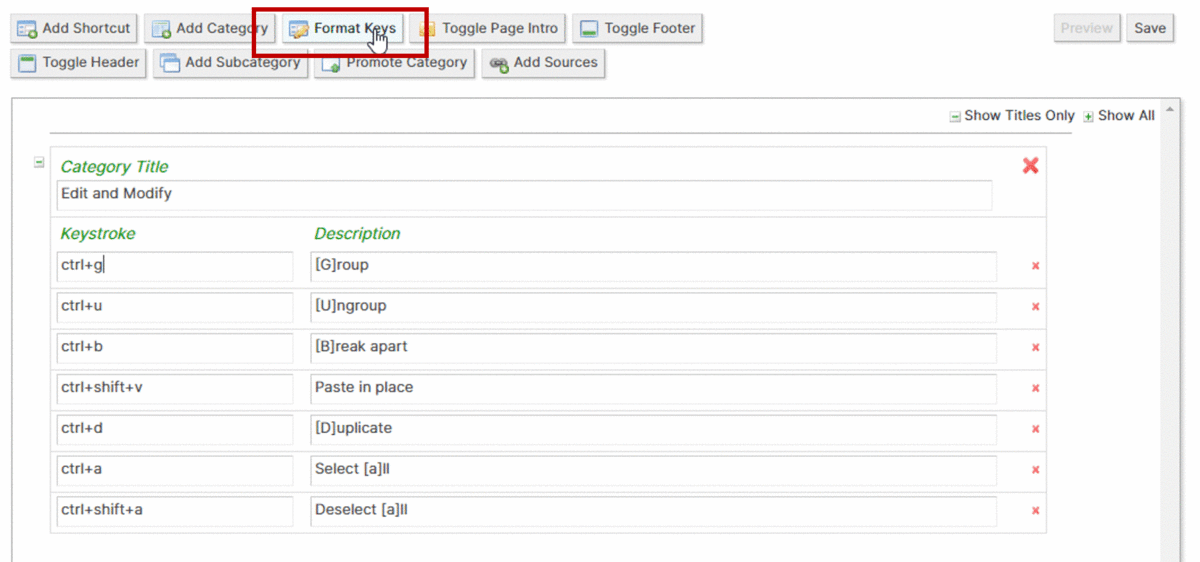
Click on 'Format Keys' to add square formatting brackets and fix capitalization.
Use the red cross on the right-hand side to delete single lines or complete categories. Drag and drop categories or single shortcuts to move content around. Add subcategories or promote categories. There is currently no demote function, please use the XML editor to add the XML tags for the same.
All shortcut content is stored as XML format. You can edit XML directly in the Editor by clicking on 'Capture edits and switch to XML Editor'. The XML Editor can be used to quickly copy & paste complete Shortcut Pages. For example, you may have created a Windows version of a Shortcut Page and want to create a MacOS version of the same. You can use a local text editor to search and replace CTRL with COMMAND and ALT with OPTION to create most the respective MacOS Page. At any time, you can switch back and forth between Page Editor and XML Editor. The XML Editor will let you know if an XML file is valid or not upon clicking on 'preview', 'save', or when switching editors. Below the instructions on how to work with the XML files. In its most basic form, a Shortcut Page only needs the XML declaration, one <root> tag enclosing the document, and <shortcut> tags holding keystroke (<keys>) and description (<text>) each
The following characters can be used in the XML Editor, either with or without square brackets.
To structure documents, <category> and <sub_category> tags can be used. It is then required to provide a <title> and all <shortcut> tags must be categorized:
Each Page can have one <intro> tag for text at the beginning of the page and <header> or <footer> tags for text at the beginning or end of any category Category or Sub-Category. A <source> tag lists sources used when compiling the page. Sometimes links may not be displayed globally due to link-spam.
Once page is created, please click on 'save' first. This will create a Shortcut Page Draft in your account. You can come back and edit later any time. If editing is completed, please click on 'Submit for Approval'. Pages are usually approved within 24 hours of submitting and you get an email update once the page is live.
Please follow the guidelines on best practices below. It is meant as general guidance and not all rules make sense in all situations. Overall goal is to encourage consistency and standards across the project, improve user experience and support the contribution process. Generally, goals of the project are to provide Shortcuts in an easy and simplistic format. Generally, please
Do's and Dont's for Shortcuts expressions
| Do's | Dont's | |
| Make every word count, less is more. | Save document | Save the current document to disk |
| Period at end of sentence is optional, unless there are full sentences. | Close Window | Close Window. |
| Active verb forms | Move one cell to the right | Moves one cell to the right |
| Consistent terms across the page | Close Webpage, Open Webpage, Save Webpage | Close Webpage, Open Page, Save Web Site |
| Prefer single quotes | Open 'Control Panel' menu | Open "Control Panel" menu |
| Provide hints in description | [Ctrl]+[S] - [S]ave Document | [Ctrl]+[s] - Save Document |
| Combine functions which belong together | [+]/[-] - Zoom in/ out | [+] - Zoom in [-] - Zoom out |
| Keystrokes go in square brackets | [Ctrl]+[V] | Ctrl + V |
| Capitalize first letter of Keystroke | [Alt]+[D] | [ALT]+[d] |
| No spaces between keystrokes or keystroke combinations | [Ctrl]+[V], [+]/[-] | [Ctrl] + [V], [+] / [-] |
| Use dots (...) for alphanumeric or numeric ranges | [0]...[4] | [0]-[4], [1]-[4], [0],[1],[2],[3],[4] |
| Consistent use of 'Arrow Keys' terms | [Arrow down] | [Down Arrow], [Down-arrow], [Downwards arrow], [?] |
| Combine keystrokes with slash | [Arrow up]/[Arrow Down] | [Up arrow] and [Arrow down] |
| Simplify arrow keys | [Arrow keys] | [Arrow Up]/ [Arrow Down]/ [Arrow Right]/ [Arrow Left] |
| Mouse-keyboard gestures | [Ctrl]+drag | [Ctrl] and drag, [Ctrl]-drag, hold [Ctrl] and drag... |
| Left Mouse button | [Ctrl]+left click | [Ctrl]+click on left mouse button |
| Omit second [alt], [option], etc. for combinations | [Alt]+[Shift]+[Arrow left]/[Arrow right] | [alt]+[shift]+[arrow left]/[alt]+[shift][arrow right] |
| User line breaks [br] for readability | [Alt]+[Shift] +[Arrow left]/[Arrow right] | [alt]+[shift]+[arrow left]/[arrow right] |
| Space Key | [Space] | [spacebar], [space bar] ... |
| Escape key | [Escape] | [ESC], [Escape] |
| NumLock Key | [Num lock] | [NumLock], [NUM LOCK] |
Icons in the Editor are based on the Silk Icons Set. Syntax coloring from CodeMirror.
Advertising for Consideration:
Ad for Consideration:
Please kindly review and accept Terms of Use and Cookie & Policy Policy


2 Comments for 'How to Add and Edit Content' [post comment in main thread]
Comment #2 by fcherman Jul 26, 2014 at 08:05 pm Reply
The following instructions on this page need screenshots:
1. "Pages can be added to an existing Application (click 'add' on the Context Menu on top of an existing Page)..."
I right-clicked "on the top" of an existing page. The context menu was merely my browser's (Chrome) context menu. I saw no "Add" command on it. It would be helpful to see screenshots of: 1) the specific location meant by "at the top of an existing page," and 2) the context menu we are supposed to be seeing there (it sounds like it's supposed to be a menu specific to "shortcutworld.com" but that's not what I'm seeing).
2. "To edit a page, please click on the 'edit' link on the page you want to edit and follow the instructions below."
I see no "edit" link at the top of existing pages, so a screenshot would be helpful. Or perhaps you mean existing pages that WE have added. If so, this needs to be made clear.
Thanks for a great website!
Reply #1 admin Jul 30, 2014 at 08:40 am
Noted and changed! I did not use the term 'context' menu properly. Within the ShortcutWorld Project, the menu on top is a context menu, the menu on the left a navigation menu. However, as 'context' is implying the right-mouse button, this is confusing. I made changes to the help and added screenshot for clarification
Thanks so much for your help making this better.
Comment #1 by rsking84 Nov 16, 2011 at 08:33 am Reply
The site is looking great, bernd! 2 comments:
1. Gmail is still listed under windows. It should really be moved to Webapps
2. When a user goes to edit a page there is no "cancel" button. This might be handy to add.
Keep up the great work!